VeBeGe adds a filtered copy of each camera you already have. You install it once, pick that copy inside Zoom, Meet, or Teams, and you are done. There are no settings to tune and nothing to open during a call.
That is the whole setup. Each step below has a little more detail if you want it.
Download VeBeGe and run it. It sets everything up on its own and starts straight away. No computer restart, and you will not be asked any questions along the way.
In your video app's camera settings, choose the entry named like your
webcam with (VeBeGe) after it. It usually appears right
away. If you do not see it and the app was already open, quit it
completely and open it again, since some apps only check for cameras
when they start.
VeBeGe needs a moment to build your background. A loading wheel fills in over the preview while it works, and once it is full and your video shows, filtering is live. Anyone who walks into shot behind you is quietly removed from then on, and your choice is remembered for every future call.
Open the camera or video menu in the app you use for
calls and switch the camera to the (VeBeGe) version. If you
have more than one webcam, each one gets its own filtered copy, so pick
the copy of whichever camera you point at yourself.
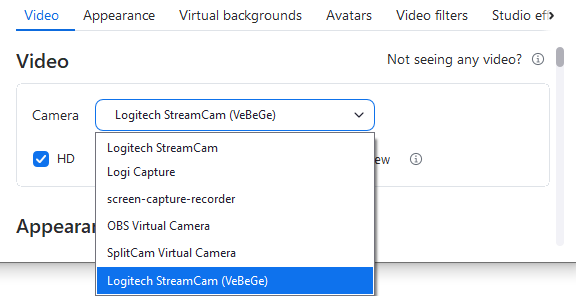
(VeBeGe) entry.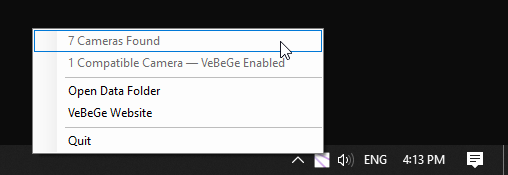
Once VeBeGe is running, a small icon sits in the system tray at the bottom of your screen. Right click it to see how many cameras were found and how many are ready with VeBeGe, to open the data folder, to visit this site, or to quit.
You do not need to touch it for everyday use. It is there when you want to check on things or turn VeBeGe off for a while.
You do not need any of this to use VeBeGe, but here is what it is up to while it runs.
A few quick answers for the most common questions.
Close the video app fully and open it again, since most apps only read the camera list when they start. If it is still missing, check that the VeBeGe icon is present in the system tray, which means it is running.
That is VeBeGe building your background for the first time after you
picked the (VeBeGe) camera. It only takes a few seconds.
Once the wheel fills, the feed is live and background people are
removed as usual.
That is on purpose. VeBeGe only turns the real camera on while an app
is streaming from the (VeBeGe) copy. Once you are in a call
and that camera is selected, the light comes on as usual.
Nothing to do. VeBeGe notices new cameras and removed ones on its own
and keeps a matching (VeBeGe) copy for each. Reopen your
video app so it picks up the new entry.
Right click the tray icon and choose Quit to stop it for now, or just
switch your app back to the plain camera without (VeBeGe)
in the name.